Creating the perfect patio can transform your outdoor space into a haven for relaxation, entertainment, and family moments. But let’s be honest, patio installation isn’t a simple weekend project for most homeowners. It requires the right planning, materials, and expertise to get it just right. At Reliable Landscaper Cheshire, we’ve worked with countless satisfied customers to bring their dream patios to life, and in this guide, we’ll walk you through every step of the process. Whether you’re exploring patio installation services for your home or planning to DIY, this guide is packed with practical advice and tips.
Why Does Patio Installation Matter?
A well-installed patio is more than just a flat surface in your garden. It adds character to your home, creates a functional outdoor area, and can even increase the value of your property. Whether you’re into minimalist designs, textured paving, or intricate patterns, there’s a patio style to suit every taste. But the process isn’t just about aesthetics. Quality matters. Poorly executed patio installations can lead to drainage issues, uneven surfaces, and inevitable repairs.
Planning Your Patio Installation Project
Determining the Purpose of Your Patio
Before you start digging, think about how you plan to use your patio. Will it be a cosy corner for morning coffee? A dining area for al fresco meals? Or a lively space for barbecues and gatherings? Your intended use will influence both the size and material choices.
Choosing the Right Materials
When it comes to materials, there’s a world of options. Here are some popular choices:
- Patio Slabs
These are versatile and come in a variety of colours, patterns, and textures. Whether you’re aiming for a clean, modern look or something more rustic, patio slab installation is a popular choice. - Concrete Patios
Concrete patio installation offers durability and affordability. The clean and minimalist appearance makes it a go-to for contemporary homes. - Paver Patios
For those who want flexibility in design, paver patio installation is ideal. With options like cobblestone or interlocking designs, pavers provide a customisable look. - Brick Patios
If classic charm is what you’re after, then consider brick patio installation. The timeless appearance of brick makes it a favourite for cottage-style or traditional homes.
Each material has its pros and cons, so consider factors like maintenance, budget, and how the material will age over time.
Patio Installation Guide
Once you’ve planned your patio, here’s what the installation process typically involves:
1. Site Preparation
Preparation is everything when it comes to a successful patio installation. Begin by clearing the area of any plants, debris, or existing materials, such as old paving. If you’ve chosen patio installation services, professionals will use tools like string lines, spray markers, and wooden stakes to outline the layout properly. Remember to include a slight slope to aid water drainage – this is critical for preventing pooling on rainy days.
2. Excavation
Digging the area is a vital step to provide a strong base for your patio. Typically, an excavation depth of around 150mm is recommended, although this may vary depending on the type of patio, such as concrete patio or paver patio . The depth should accommodate the subbase, bedding layer, and your chosen paving slabs or bricks.
3. Setting the Subbase
The subbase acts as the backbone of your patio and ensures its longevity. Typically, Type 1 MOT (a mix of crushed stone and gravel) is used, as it compacts beautifully and is readily available. Contractors will spread the subbase material evenly, aiming for 100mm or more, depending on the project size. Once laid, they’ll use vibrating plate compactors to pack it down, ensuring it doesn’t shift over time.
4. Adding the Bedding Layer
The bedding layer is essential for supporting your chosen patio finish. A mix of sharp sand and cement is commonly used, creating a firm but pliable base for installation. Skilled professionals use around 30-50mm of this mixture, raking it to level out the surface.
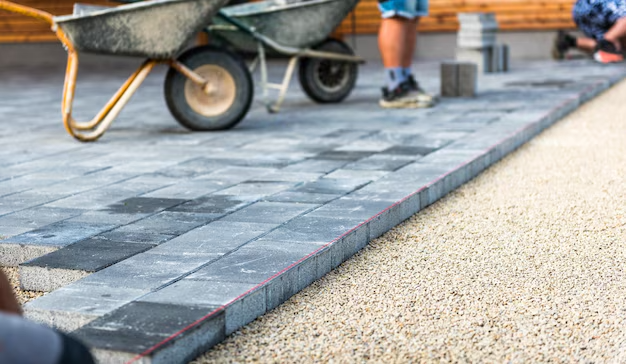
5. Laying the Patio
Now comes the exciting part – turning your vision into reality. The laying process varies slightly depending on the materials you’ve chosen, such as brick patio installation versus concrete patio installation. Regardless of the material, precision is critical.
Start from a corner or a fixed point, laying each piece according to a pre-planned pattern. Use plastic spacers to maintain consistent gaps for jointing. Professionals often use rubber mallets to gently tap the slabs or pavers into the bedding layer, ensuring everything is firmly in place but not cracked. If you’re using bricks or a distinctive paving style, keep the design symmetry in mind to avoid last-minute adjustments.
6. Jointing and Sealing
Once all your slabs, bricks, or pavers are securely laid, turn your attention to the joints. The gaps between the paving need filling to prevent weed growth and make the surface more secure. Professionals usually use a resin-based jointing compound or a traditional sand-and-cement mix brushed into the joints, depending on the level of durability required.
After jointing, many choose to seal the patio with a protective sealer. This step is particularly important if you’ve gone for natural stone or patio slab, as it helps to preserve the colour and protect against stains caused by algae or spills.
Common Patio Installation Mistakes to Avoid
- Skipping the Subbase: Without a proper subbase, even the best patio designs will fail over time.
- Poor Drainage Planning: Water pooling can ruin your patio’s appearance and cause structural issues.
- Uneven Laying: Uneven surfaces are both unsightly and unsafe. Professional skills make a world of difference here.
Why Choose Professional Services in Cheshire?
If you’re in Cheshire, choosing local experts for your project is a wise move. Professionals not only have the skills to deliver high-quality work but understand the specific needs of the area’s soil and weather conditions. At Reliable Landscaper Cheshire, we pride ourselves on transforming outdoor spaces with meticulous care.
Maintaining Your Patio Over Time
A beautifully installed patio deserves proper upkeep. Here’s how you can maintain it:
- Regular Cleaning: Brushing off dirt and debris weekly prevents buildup.
- Weed Management: Use specialised weed-killing sprays or joint sealants.
- Repairs: Fix small cracks and joint gaps promptly to avoid further damage.
- Re-sealing: Reapply sealant every few years to preserve your patio’s appearance and durability.
The Cost of Patio Installation
Budgeting is a crucial part of the process. The patio installation cost can vary significantly depending on factors like size, design complexity, and materials. On average, a standard patio installation in the UK can range from £1,500 to £5,000. For Cheshire homeowners, working with professionals like Reliable Landscaper Cheshire ensures transparent pricing and value for your investment.
Why Choose Us at Reliable Landscaper Cheshire?
At Reliable Landscaper Cheshire, we know that your outdoor space is an extension of your home. That’s why we take the time to listen and work with you to create a patio that fits your lifestyle, taste, and budget. With years of hands-on experience and a passion for landscaping, we’ve earned a reputation for excellence throughout Cheshire.
Contact us today to discuss your vision, and we’ll help you bring it to life. Call Us now or visit our website to get started. Your dream patio is just a step away!